Working with a Unilock Authorized Contractor is working with the best of the best. Our UACs possess the knowledge and expertise to bring your dream project to life, and deliver stunning results that will exceed your expectations.
How to Construct Steps
The principle of constructing steps is the same no matter what stones or concrete products you use. There are three basic types or configurations when constructing steps using precast concrete blocks:
1. Large Concrete Slabs
2. Modular Hardscape Blocks with NO coping
3. Modular Hardscape Blocks WITH coping

The purpose of course is to get from a lower elevation to a higher elevation. So it is very important to utilize the unit measurements in order to achieve the correct number of steps. When the construction of steps is described there are certain words that are commonly used and they are shown in the diagram below.
The first two measurements that you need to know are the rise (A) and the run (D). This will help you determine the correct number of concrete units that you will require. The next thing you will need to know is the height (B) of the concrete unit and also the tread depth (C) that is required to make up the complete run. For very long runs, you can place paving stones in between the concrete units in order to make the depth of the tread much deeper. We always recommend that you take a sketch of your slope and take it to a Unilock Dealer who can assist you in calculating exactly what you need, or to work with a professional landscape contractor who is experienced in these types of installs.
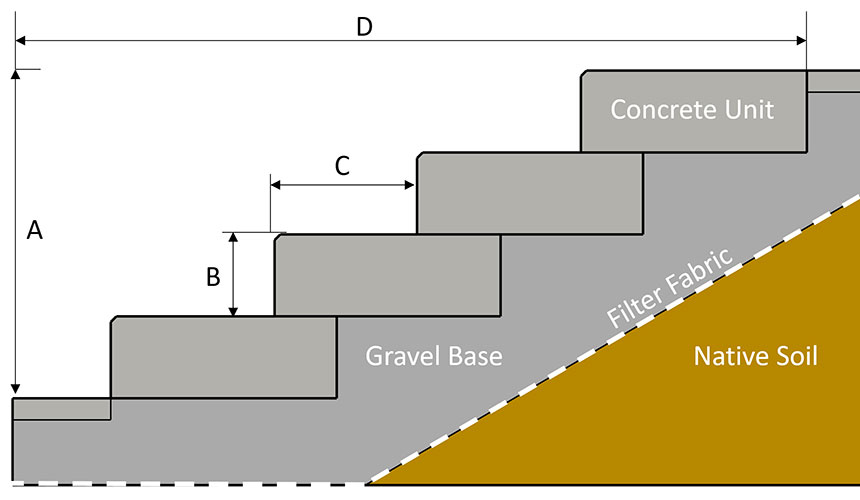
When constructing steps it is very important that you remove all the sod and topsoil on the embankment. Never build steps over topsoil. If you do, then the steps will be subject to settling or heaving during the winter making the steps unsafe to use. It is also important that the native soil that remains is well settled and has not been disturbed in recent years. Once all the sod and the soil is removed you can begin the next part of the preparation. Place a non woven filter fabric over the native soil in the areas where you will be building steps.
Now you can place your gravel over the filter fabric up to the correct elevation in order to start your first step. Steps are always constructed from the bottom to the top. Large units as shown in the above illustration may need to be installed by a contractor who will use a small machine to put the units in place. Many do-it-yourselfers prefer to use the smaller modular blocks because they are much easier to handle and transport into their yard. Either way the base preparation is always the same.
Compaction of the gravel base is the most important part when constructing steps. This can be done using a hand tamper or a mechanical tamper and you must achieve the maximum compaction possible. A granular gravel made up of small 3/4 inch stones and sand mix is the best base for constructing steps.
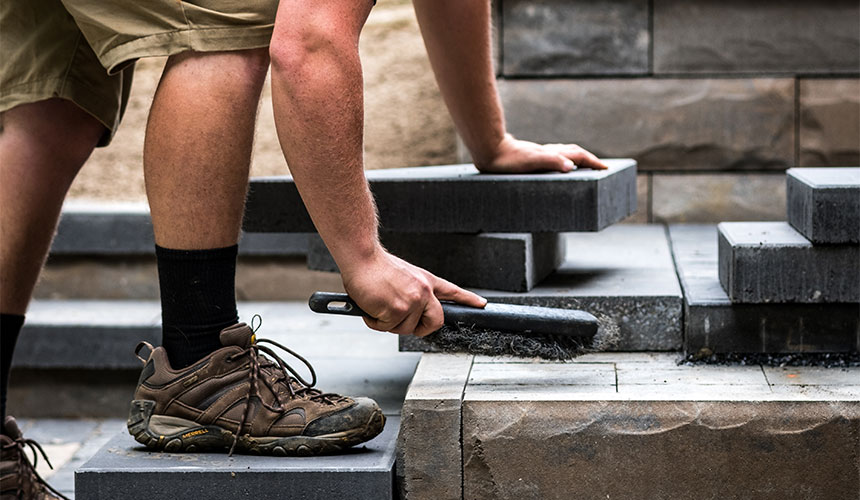
Once you have levelled and compacted the gravel, you are ready to begin placing step units. Each step unit must be carefully placed using a level. You can make some minor elevation adjustments using a finer gravel or stone chip. Once the first step is in place, you are ready to backfill and compact more gravel in order to set the second step. Repeat this process until you have reached the top level of your staircase.
If you are using smaller modular concrete units with a coping for your steps, be sure to use adhesive between the coping and the blocks so that the entire configuration becomes like a monolithic unit, which is safer and will perform better over time.
To browse our wall products, click here. To browse our step products, click here.
Related
Articles

We’re Here
To Help
Browse our Design Idea Catalog
Explore endless design possibilities through our Design Idea Catalog. Browse our extensive portfolio of paver and wall products, and get inspired by our outstanding design projects that will fuel your creative expression.

Visit an Outdoor Idea Center
Experience the beauty and quality of Unilock paver and wall products in a life-sized setting by visiting a local Outdoor Idea Center. Our knowledgeable and friendly staff are on hand to answer any questions and offer free product samples.
