You can return any time by using the sub-menu at the top of your screen.

Share this

Retaining Wall Construction 101
Retaining walls are becoming more popular as we construct many vertical landscape features or seek to increase the actual useable space of a given area of land. These walls can be divided into 2 camps: Structural or non-structural. Non-structural generally refers to low landscape features such as grill islands, planters or garden walls under 2 feet in height. Structural walls on the other hand are generally walls over 2 feet in height. These walls are intended to hold up embankments to gain additional horizontal space, such as a cut-in to accommodate a driveway or a fill-in to hold up a pool deck or patio that needs to be constructed on a severely sloped property.
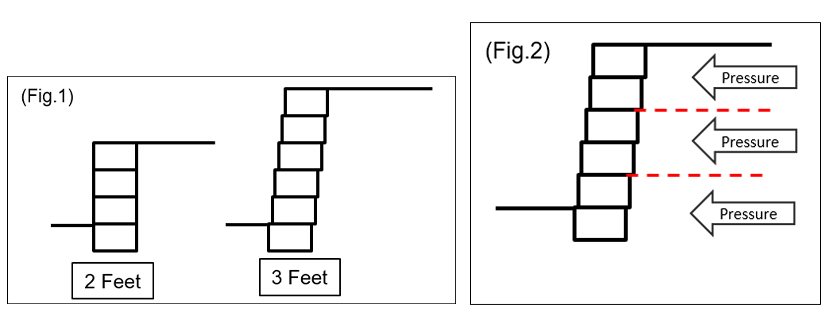
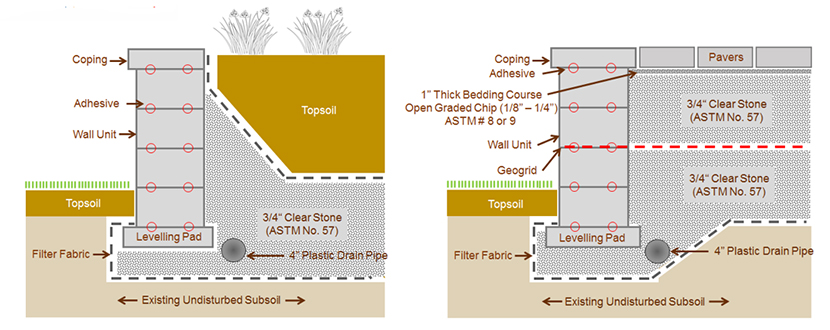
Some retaining wall products come with integral locking features, such as tongue and groove, pins, back hook lips, channel inserts etc., but some systems such as Brussels Dimensional Stone®, Lineo™, and Quarrystone rely only on concrete adhesive. These systems cannot be constructed any higher than 2 feet. However, these landscape retaining walls can go higher than 2 feet if the blocks are installed in a setback position instead of a vertical position. (Fig. 1) To construct retaining walls higher than 4 feet, you must reinforce the wall with a geogrid mesh that is placed in between the blocks and extends back into the backfill to help resist the overturning forces of the retained earth. (Fig.2)
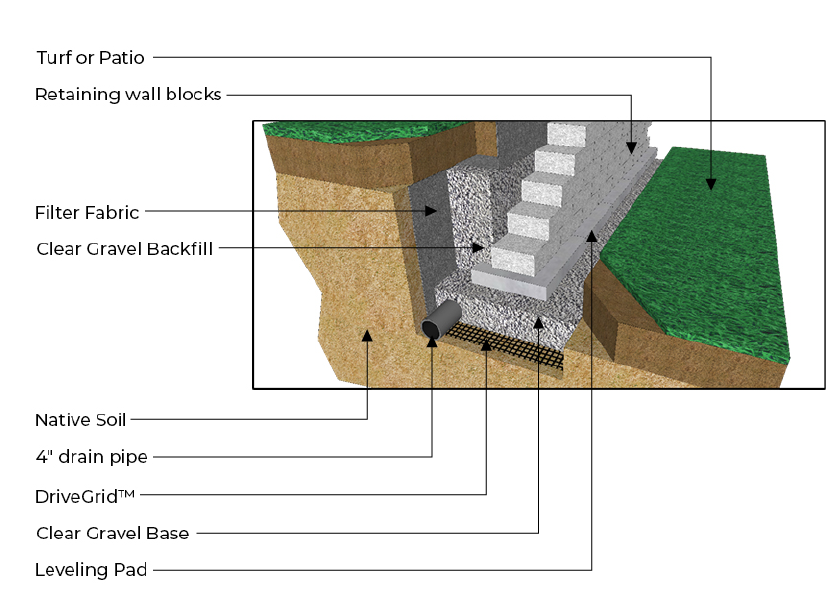
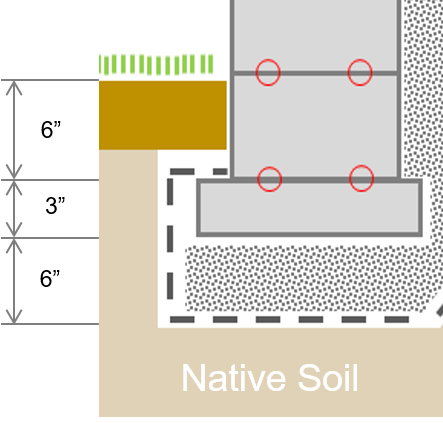
Anatomy of a retaining wall
How to Build Basic Retaining Walls Step-By-Step
- Retaining walls and garden walls both have similar construction requirements. (See Fig. 3+4). They both need:
- To be constructed on solid undisturbed ground to prevent settlement
- Free–draining gravel base to prevent water pressure build-up or frost movement of the wall
- Clear gravel stone behind the wall to reduce water or frost pressure behind the wall
- Levelling Pad (modular slab or poured)
- Filter fabric to prevent soil from eventually migrating into the clear gravel
- Drainage pipe to carry excess water away to lower area of property
Base preparation
- Excavate a trench minimum 12” to 16” deep depending on the block height. The trench should be twice the width of the wall unit.
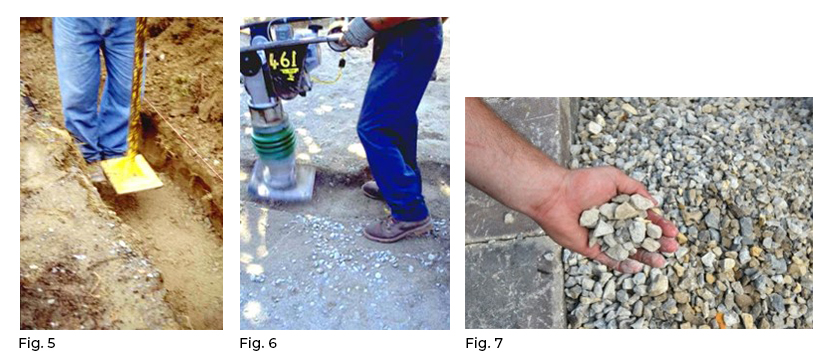
- Ensure that all topsoil is removed. If the ground is comprised of loose fill, it will first need to be removed or compacted to prevent any further settlement. The best tools for this are a hand tamper or a jumping jack ramming compactor. (See Fig. 5+6)
- Line the trench with a landscape filter fabric or DriveGrid®
- Place 4” to 8” of gravel in the trench. (See Fig. 7)
- The gravel should be free draining with particles ranging from 3/8” to 3/4” (ASTM No.57).
- Ensure that the trench will accommodate at least one complete row of wall units below grade.
- Using a jumping jack, a hand tamper or a plate compactor, compact the gravel in the trench. (See Fig. 5+6)
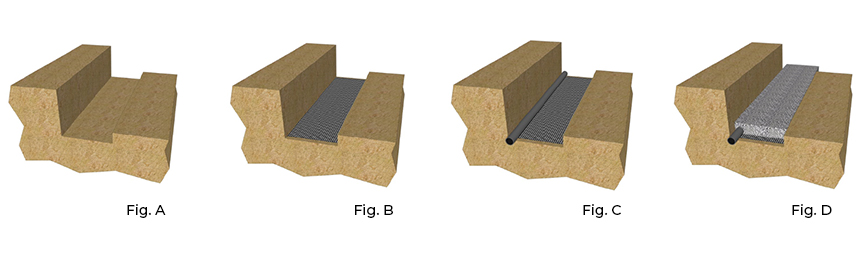
- Excavate a trench minimum 12” to 16” deep depending on the block height. The trench should be twice the width of the wall unit. Ensure that all topsoil is removed. If the ground is comprised of loose fill, it will first need to be removed or compacted to prevent any further settlement. The best tools for this are a hand tamper or a jumping jack ramming compactor. (See Fig. A)
- Line the trench with a landscape filter fabric or DriveGrid®. (See Fig. B)
- Place a 4” perforated pipe at the back of the wall for drainage to grade (See Fig. C)
- Place 4” to 8” of gravel in the trench. (See Fig. D) The gravel should be free draining with particles ranging from 3/8” to 3/4” (ASTM No.57).
- Ensure that the trench will accommodate at least one complete row of wall units below grade. Using a jumping jack, a hand tamper or a plate compactor, compact the gravel in the trench.
Laying the Retaining Wall Blocks
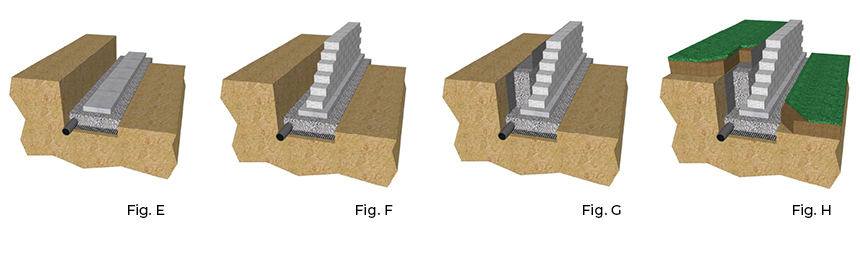
After the base has been placed and compacted it is time to install the retaining wall blocks. Each system will have its own method of connection such as tongue and groove, clips or adhesive. Follow the directions specific to those products.
- Install Levelling block units at bottom of trench. Ensure that they are level end to end and from front to back. (Fig. E)
- Begin to place the retaining wall units. Blocks must always be off set ½ unit so that the joints are staggered.
- Never build higher than the recommended maximum height for that product. (Fig. F)
- Install filter fabric against the native soil and place the backfill gravel between the blocks and the filter cloth (Fig. G)
- Wrap filter fabric over the top portion of gravel 6” below the coping surface. This will allow for topsoil and grass. Create a small swale which is graded properly to carry water away from the back of the wall. (Fig. H)
Gluing Coping to the Top
Glue the coping units to the row using a high-quality concrete adhesive. Units must be dry and dust free.
Again, always refer to product specific retaining wall construction manuals for more detailed information, or contact a Unilock Authorized Contractor to help answer your questions.
Related Articles
We’re Here To Help
We make it easy to get inspired, plan, and start your project.

See our Catalog of Dreams
Explore ideas, spark inspiration, and see our full range of Unilock products.

Get your freeestimate today
Partner with a Unilock Authorized Contractor for best-in-class results.

Plan your dream project beautifully
Excited to start a new project? Get our Project Planning Guide and plan with ease.