You can return any time by using the sub-menu at the top of your screen.
Share this

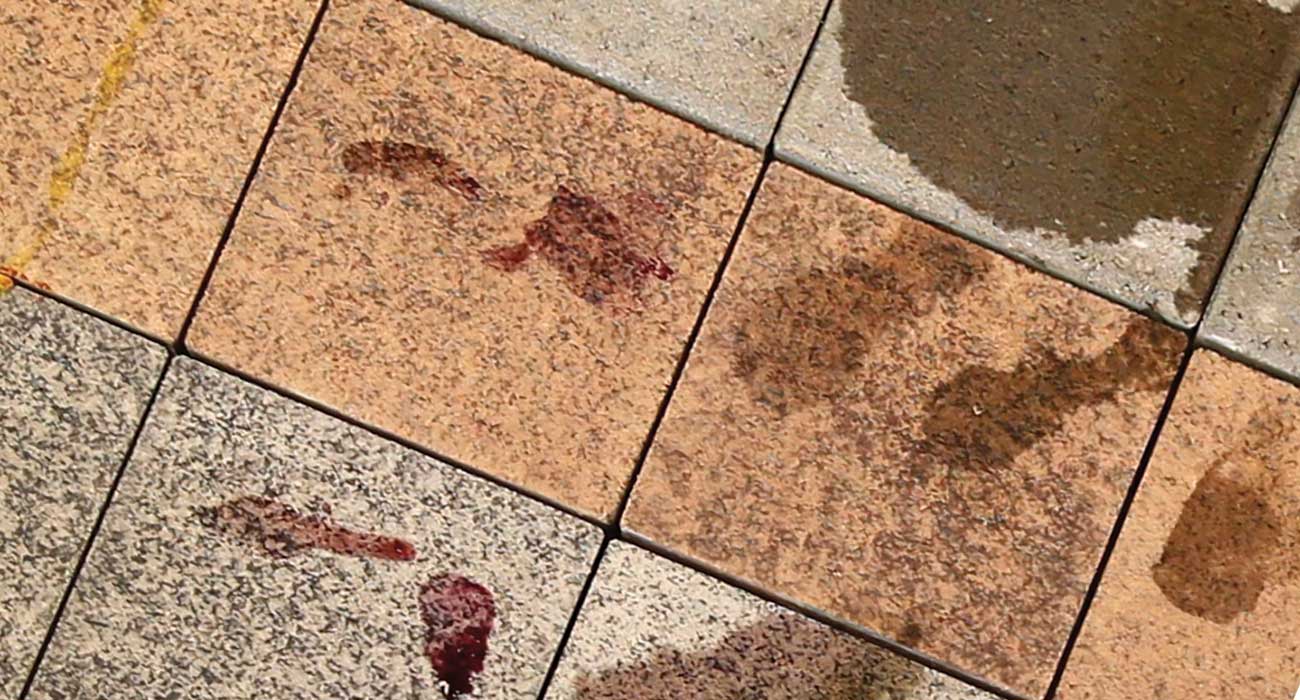
Removing Stains from Pavers
Keeping outdoor pavers looking their best is simpler when you follow a clear process that protects the paver surface, the joints, and the surrounding plants. The steps below align with practical care for concrete pavers and patio pavers and can be used on walks and driveways as well. You will start with dry cleaning, move to a gentle cleaning solution, and finish with careful rinsing so the joint sand stays in place. With the right tools, some elbow grease, and smart product choices, you can get pavers cleaned without relying on harsh chemicals.
Safety First and Preparation
Before you clean, remove furniture and other objects so you have full access to the surface. Put on protective glasses and gloves to shield skin and eyes from splashes. Sweep loose debris with a push broom so dirt and grit do not scratch the face during scrubbing. A quick rinse with a garden hose helps you see which stains are only surface grime and which areas need more attention. Mark any spots with oil or grease, rust, mildew, algae, or moss so you can treat them in order.
The Best Way to Clean Pavers
Begin with the mildest approach. Mix a simple household solution in a bucket, such as a few squirts of dish soap in warm water. Apply with a stiff-bristle brush and work in small zones. This gentle step lifts everyday dirt on patio areas and is safe for most materials. Rinse with a hose and check the result. This is often the best way to clean patio pavers that look dirty from regular use.
For food spills and light oil, sprinkle baking soda over the damp spot and agitate with the brush. Let it sit, then rinse. For organic discoloration from leaves or berries, a mix of white vinegar and water can help. Try one part vinegar to three parts water. The solution is non-toxic and easy to control. Always test a small area first and rinse well so residue does not attract dirt.
Pressure Wash Without Damaging Joints
Pressure washing can refresh paver surface color when used with care. Choose a pressure washer setting that is gentle enough to avoid scarring. Keep the wand moving and at a consistent distance. Use a fan spray and angle the stream so you do not blow out the sand from the joints. If you remove joint sand by accident, you will need to fill the joints again after the surface is dry. A pressure wash is helpful on large patio areas and driveways, but the careful operator keeps the focus on lifting grime rather than cutting into the face of concrete.
Targeted Cleaning for Stains
For grease spots from a grill or vehicle drips on driveways, blot with a cloth first, then scrub with soapy warm water. Repeat until clear. For stubborn growth in shaded areas, treat mildew or algae with a light bleach mix such as one part bleach to ten parts water. Keep the area wet while you work, protect nearby plants, and rinse thoroughly. Use this sparingly and only when needed. Never mix bleach with vinegar or ammonia.
Avoid muriatic acid as a routine cleaner. It is very acidic and can etch concrete pavers and alter the paver color. Acid should only be considered with professional guidance for specific mineral deposits and even then with great caution. Many biodegradable cleaners are available that are less aggressive yet effective when paired with patient scrubbing and a thorough rinse.
Protecting Joint Sand
During any cleaning process, protect the joint sand. If the joints look low after pressure washing or heavy rinsing, let the area dry fully, then sweep clean sand across the surface to fill gaps. If you use polymeric sand, follow the label steps and lightly mist only as directed so the product can harden correctly. Tight joints resist weeds and help keep the paver surface stable.
Rinse, Dry, and Inspect
After you scrub and rinse, allow the surfaces to dry in the sun. Inspect in a different light so you can see if any stains remain. Repeat spot treatment where needed. Once dry, return furniture and other objects to their places. A tidy layout makes routine sweeping faster and keeps the environment around the patio looking neat.
Optional Sealing
If your long-term plan includes sealing, make sure the surface is very clean and completely dry. A quality sealant can help resist future stains and may make washing easier. Follow the product guidance carefully and avoid sealing over damp areas. Remember that sealing is optional and is best scheduled when the project is fully installed and the paver surface has been cleaned of all residue.
Seasonal Care Plan
Create a light maintenance routine. Sweep weekly to remove seeds and debris. Use a garden hose for a quick rinse after dusty or wet weather. Address spills at once with a cloth or paper towel. A gentle soap solution and a small brush are often all you need to keep patio pavers and concrete pavers looking durable and fresh. For big areas or heavy build-up, consider a local service that specializes in cleaning pavers. A trained contractor has the right tools and knows how to be careful around the joints.
Key Takeaways
• Start mild, then move up only as needed
• Test every solution in a discreet corner
• Keep the wand moving during pressure washing
• Protect nearby plants when you use any chemicals
• Never use a wire brush which can leave metal fragments behind
• Rinse thoroughly and let the surface dry before you judge the result
With patient steps and the right materials, you can keep outdoor pavers clean, safe, and ready for daily use. A simple routine preserves beauty, supports performance, and reduces the need for stronger treatments later.
If you’re interested in some outdoor living inspiration to help spruce up your next outdoor project, visit our Catalog of Dreams or speak with a Unilock Authorized Contractor.
Related
Articles
We’re Here To Help
We make it easy to get inspired, plan, and start your project.

See our Catalog of Dreams
Explore ideas, spark inspiration, and see our full range of Unilock products.

Get your freeestimate today
Partner with a Unilock Authorized Contractor for best-in-class results.

Plan your dream project beautifully
Excited to start a new project? Get our Project Planning Guide and plan with ease.