You can return any time by using the sub-menu at the top of your screen.
Share this

How to Install Pavers on a Slope
Installing pavers can add charm, function, and value to your outdoor living space. Installing pavers on a slope can also be a rewarding DIY project if you follow the right steps. The process can be a little tricky if you’re dealing with a sloped surface. Slopes present a unique challenge when it comes to creating a safe and stable surface to walk on, as well as preventing erosion. However, with the right tools, techniques, and useful tips, you can successfully install pavers on a slope and create a stunning outdoor area that will serve you for years to come. We’ll cover everything you need to know about installing pavers on a slope, including step-by-step instructions, how to calculate the slope, and tips for preventing erosion.
Can You Install Pavers on a Slope?
Yes, you can install pavers on a slope. However, installation may require extra preparation to make sure that the pavers are stable and will not shift over time.
Sloped installation may also require the use of retaining walls or other means to level the area. It is important to follow proper installation steps and use the right tools and materials for the job to ensure a successful installation.
Working with a professional contractor who has experience working with slopes can help you ensure that the pavers are installed properly and will remain stable over time.
How To Install Pavers on a Slope in 10 Steps
Installing pavers on a slope can be challenging, but with the right preparation and technique, it can be done successfully.
The best starting point is to assess the slope’s steepness and the degree of its slope, so you can plan whether or not you need a retaining wall to help level things off. A gentle slope is easier to work with and requires less preparation than a steep slope.
Here’s how to install pavers on a slope in 10 steps:
1. Prepping the Area
Use stakes, marking paint, or even a flexible rope or garden hose to outline the area. Clear the area where you want to install the pavers. Remove any grass, debris, rocks, or roots. If the slope is steep, you may need to use retaining walls or other means to level the area.
2. Use Stakes to Mark the Area
Use a level strapped to a straight 8 or 10 foot long board, or an aluminum straight edge to help you determine the overall slope while using a tape measure to measure the height from the board to the ground at various points.
Patios may be sloped to a maximum of 2%. This means a 2 inch drop over 100 inches. Walkways may slope 5% (5 inch drop over 100 inches) provided that the walking surface is non-slip. If your project slopes more than this, consider adding in a couple of steps or levels to minimize the slope. Do this whenever possible to ensure a safe walkway slope.
You can also excavate the higher area out in order to achieve the desired slope.
3. Prepare the Base
To install a good gravel base, you will need to excavate by digging down approximately 8 inches, sometimes even more if the subsoil is made up of poorly draining clay, or if you need to level the slope a bit.
Tip: The slope of your excavation determines the slope of the final paver surface, so make sure to get this correct at the beginning. A laser level or a string line can be used to ensure that the slope is consistent throughout the installation area.
Use a plate compactor (or a hand compactor for small jobs) to compact any remaining loose dirt caused by excavation. After this, it is recommended to lay down a layer of DriveGrid directly over the subsoil, which will reinforce the base gravel.
Place gravel on top of the DriveGrid and begin the compaction process using a vibratory plate compactor. This gravel must be compacted in several passes. For example, a 9 inch base should be installed in 3 inch layers and compacted each time to achieve full compaction.
4. Install the Paver Bedding Course
A bedding course is a one inch layer of fine chip stone or coarse sand that is “screeded” over the compacted gravel base. The pavers are laid on this screeded surface, which must conform to the desired finished grade.
Screeding is an easy procedure to make a very flat surface. This process is also used for leveling concrete. Place two – 10 ft. long 1″ diameter pipes over the gravel. Adjust the heights of these pipes as required to conform to the finished slope. You can do this by adding handfuls of screeding material under the pipe to raise them, or remove a little gravel under the pipe if you have to lower them. Once set in place, add enough of the bedding material over the base to slightly cover the pipes. Then use a long straight board or aluminum straight edge to “draw” back the excess which will leave behind a beautifully flat surface. Carefully remove the pipes and fill in the grooves with a small amount of bedding material which can be smoothed using a small metal trowel.
5. Install the Pavers
Now that your surface is perfectly flat, begin installing the pavers in the desired pattern starting at the lowest point of the installation and work towards the highest point. Use a string line to maintain straight lines. Don’t lay the pavers too tightly next to each other and do not use a mallet to hammer them into place. (The final compaction that you do at the end of laying all the pavers will make everything nice and flat.)
6. Cut the Pavers to Fit
Inevitably, there will be some pavers that need to be cut. You can rent a diamond blade masonry saw from your local paver dealer or rental company for this purpose. Before cutting a paver, measure the size and mark it with a piece of chalk or a pencil. Curved walkways are achieved by cutting a series of short straight cuts to achieve the radius.
Important: Always wear personal safety gear when cutting. Eye, ear and dust protection is a must.
7. Securing the Edge
If the edge pavers are not up against a fixed curb or building, they must be restrained to prevent horizontal drift. This is accomplished by spiking a special plastic or aluminum paver edging around the perimeter with 12” metal spikes. Alternatively, a concrete wedge trowelled up against the outer edge is also commonly used as an edge restraint. This concrete should be below the paver edge by one inch so that you can put soil and grass up to the paver edge.
8. Compacting the Pavers
The final step to a great looking paver surface is to do a final compaction directly over the surface of the pavers using a vibratory plate compactor. Make sure the compactor is outfitted with an anti-scuff pad so you do not scratch the surface. A special compactor outfitted with small rubber rollers can also be used if available from your local rental company.
Important: Make sure the surface is completely free of dirt, debris or any sand before compacting. Leaving sand or dirt on the surface will potentially scratch the surface during the compaction process and also impede on the ability of the compactor to make a really flat surface.
9. Filling the Paver Joints
Paver joints can be filled in with a sharp masonry sand, but a polymeric sand is preferred especially for sloped applications because it will harden up and prevent joint erosion and also prevent weed seeds from germinating between the joints. There are many types of polymeric sand out there. Be sure to read the manufacturer’s directions on how to apply the sand.
10. Seal the Pavers (Optional)
This is an optional step. Applying a concrete sealer to your pavers after installation helps protect and also enhance their appearance. Unilock also has available several pre-sealed pavers which will not require sealing.
Sealing is also useful for pavers installed on a slope to help prevent sand from washing out of the joints because it helps lock the joint sand into place.
Need help with your outdoor project? Find A Unilock Authorized Contractor
How Much Slope is Required When Installing Pavers?
Planning on going the DIY route instead? If so, you’ll need to calculate the slope of the area where you plan to install pavers. The slope will depend on several factors, including the purpose of the area, the type of pavers you are using, and local building codes and regulations.
In general, the slope should be gradual enough to prevent water from pooling around the pavers, but not so steep that the pavers installation will become unsafe to walk on, especially in the winter.
A common guideline is to have a 1-2% slope away from any structures, such as a house or building, to ensure proper drainage. This means that for every hundred inches of horizontal distance, the slope should drop by 1-2 inches.
How Do You Calculate the Slope for Paver Installation?
The slope of an area can be calculated using a few different methods, depending on the size and shape of the area.
Here are a few ways to calculate the slope:
1. Measure With Tape and Level
This method involves using a measuring tape and a level to measure the rise and run of the slope. The rise is the vertical height of the slope, and the run is the horizontal distance.
To calculate the slope, divide the rise by the run and multiply by 100 to get a percentage.
For example, if the rise is 6 inches and the run is 10 feet, the slope would be (6/120) x 100 = 5%.
2. Use An Online Slope Calculator
If you have the dimensions of your slope, you can use an online slope calculator to calculate the slope percentage. There are many free online slope calculators available, where you can simply enter the rise and run values to get the slope percentage.
3. Hire A Professional Surveyor
For larger or more complex projects, a professional surveyor may use specialized equipment, such as a total station or a digital level, to accurately measure the slope.
When you’re done with measuring, try experimenting with Uvision, a terrain tool for slopes that creates designs that will give you a more realistic picture and help you create various elevations within the design.
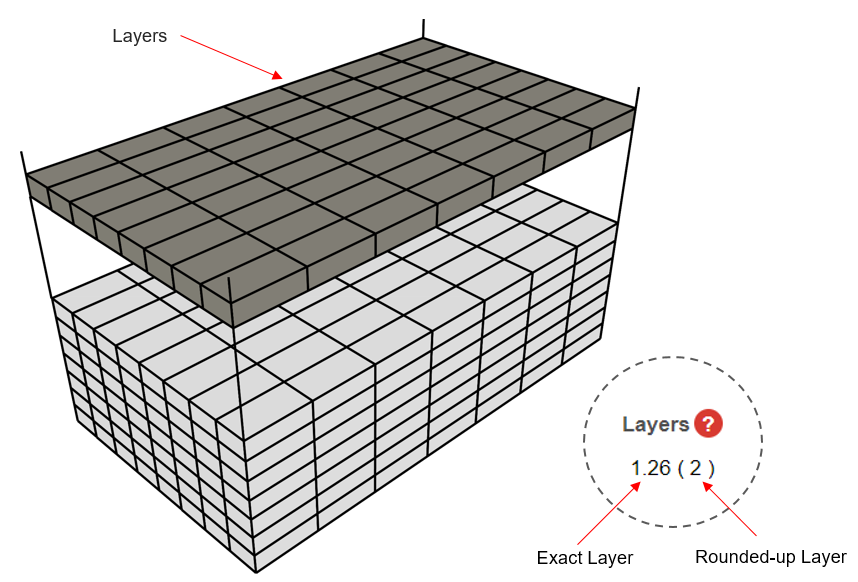
Not sure how many pavers you need? Use Our Paver Calculator
Equipment Needed To Install a Patio on a Hill
When installing pavers on a slope or a patio on the side of a hill, it’s important to have the right equipment to ensure that the job is done properly and safely.
Here are some of the essential tools and equipment you’ll need for your hardscaping project:
- Safety equipment: Work gloves, safety glasses, hearing protection, dust protection and sturdy work boots are must-haves.
- Measuring tools: A measuring tape, string, and stakes will help you mark out the area.
- Compactor: A compactor machine is used to compact the base material and ensure a stable, level surface for the pavers.
- Laser level: A laser level is a tool that projects a laser line on the ground, helping to level the base material and ensure the slope is consistent throughout the installation.
- Shovels and rakes: Shovels and rakes are used to excavate and level the ground, remove debris, and distribute the base material.
- Plate compactor: This machine will help you compact the base and create a stable foundation for the pavers.
- Wheelbarrow: A wheelbarrow will make it easier to transport materials like gravel or sand.
- Rubber mallet: A rubber mallet is necessary for occasional height adjustments and alignment.
- Diamond-bladed saw: These tools will help you cut pavers to fit around curves or other obstacles.
- Polymeric sand: This special sand will fill the joints between the pavers and harden when exposed to water.
- Drainage materials: Depending on the slope’s degree, you may need to install drainage pipes, French drains, or dry wells to direct water away from the installation area.
- Edge restraints: Edge restraints are used to secure the pavers in place and prevent shifting. They can be made of plastic, metal, or concrete.
Tips For Preventing Soil Erosion When Installing Pavers
Soil erosion can be caused by water runoff and can result in the displacement of the pavers and damage to the underlying soil. These expert tips can help you prevent soil erosion when installing pavers:
- Use geotextile fabric: Geotextile fabric or DriveGrid are permeable separators that can be placed over the subsoil to help prevent migration of the base gravel into the subsoil below. It must allow water to pass through. When cutting the fabric to fit the installation area, leave a few extra inches on all sides to allow for overlapping and securing of the fabric.
- Install edging materials: Edging materials like concrete, plastic, or metal can help hold the pavers in place and prevent them from shifting. This will also help prevent soil erosion by creating a barrier around the installation.
- Consider retaining walls: Retaining walls can be used to level a sloped area and create a flat usable patio area. This can help prevent embankment erosion by slowing water runoff.
- Use polymeric sand: Polymeric sand hardens when exposed to water. It can be used to fill the joints between the pavers and help prevent water from washing away soil.
- Install drainage: If the area is prone to water buildup, consider installing drainage like French drains, trench drains, and catch basins. Choose the drainage system that is best suited to the specific needs of your installation area. This will help direct water away from the installation and prevent it from eroding the soil.
Explore Unilock Pavers for Your Slope Project
Looking for top-quality pavers for your outdoor project? Explore our extensive selection of pavers at Unilock.
With a wide variety of products to choose from, including natural stone, concrete, and porcelain options, we’re here to help you find the perfect pavers to match your style and budget.
With our focus on quality and durability, you can trust that your Unilock pavers will withstand the test of time and look beautiful for years to come. Whether you’re installing pavers on a slope or a flat surface, we offer the expertise and products you need to create a stunning outdoor space.
Connect with a Unilock Authorized Contractor to help turn your dreams into a reality.
Related
Articles
We’re Here To Help
We make it easy to get inspired, plan, and start your project.

See our Catalog of Dreams
Explore ideas, spark inspiration, and see our full range of Unilock products.

Get your freeestimate today
Partner with a Unilock Authorized Contractor for best-in-class results.

Plan your dream project beautifully
Excited to start a new project? Get our Project Planning Guide and plan with ease.