You can return any time by using the sub-menu at the top of your screen.
Share this
8 Common Paver Installation Mistakes and How to Avoid Them
While a beautifully paved space will certainly draw the eyes of envious neighbors, it’s important to remember that even the greatest designs can fall short if the installation isn’t done correctly. Whether you choose to tackle a DIY project or hire a professional contractor, here are 8 of the most common paver installation mistakes you’ll want to avoid that will save you from making costly repairs down the road.

#1: Improper Site Preparation
Proper site preparation goes beyond clearing an area of excavated earth and other materials. It involves careful planning, assessment, and a clear understanding of your site’s conditions.
Here are a few tips to ensure you have prepared your jobsite efficiently:
- Plan your project’s timeline and budget: When tackling a DIY project, you’ll need to plan out how much time you can realistically dedicate to completing the installation. Depending on the scope of the job, you may want to schedule your project over several days or weekends and enlist friends or family to help with tasks like grading, excavation, and paver installation. The cost of renting or purchasing tools and equipment, as well as the disposal of any excavated materials, will also need to be factored into your project’s budget and timeline.
- Understand your site’s soil conditions: The soil conditions on your site, load requirements, drainage, and the thickness and style of your pavers and walls all play a role in how deep you will need to excavate. When working in areas where the soil conditions are poor, there is potential for surface deformation or settlement. In these cases, you will need to increase the depth of your base to ensure greater long-term stability for your project. Alternatively, a jobsite with well-draining sandy soil may require less excavation due to its natural ability to manage water more efficiently.
- Hire a professional: When in doubt, hire a professional paver contractor. Our Unilock Authorized Contractors possess the expertise and knowledge in proper site preparation, excavation, and installation best practices. Because they’ve met our highest standards, we proudly back their work with a minimum two-year Workmanship Guarantee, providing you peace of mind every step of the way.

#2: Insufficient Base Preparation
A weak or poorly compacted base is one of the leading causes of pavers sinking, shifting, or cracking over time.
Avoid this common paver installation mistake by following these steps:
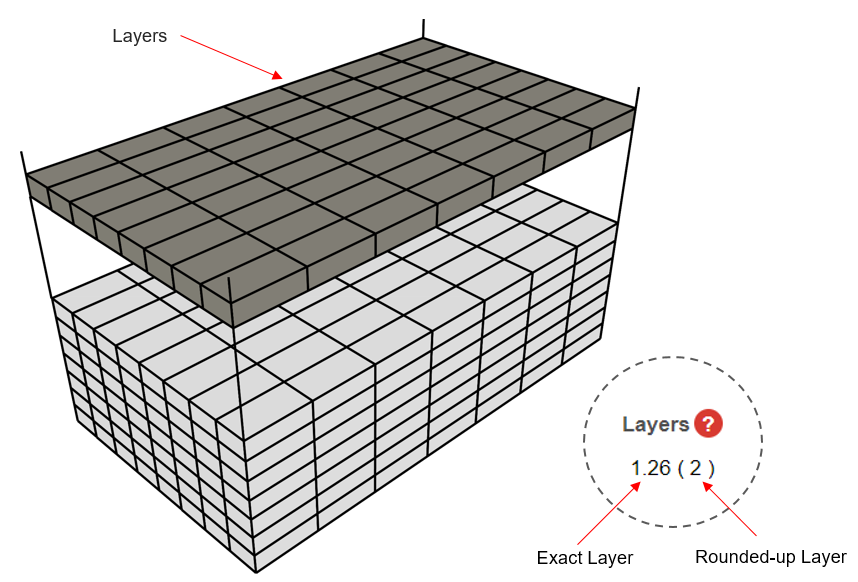
- Excavate deep enough: As we discussed in the previous paragraph, you’ll need to dig to the appropriate depth to account for each level of base material. For patios, pool decks, and walkways, you’ll need to dig roughly 10”-14”, depending on your subsoil conditions. Driveways will require additional excavation up to 16” as they need to be able to support the weight and movement of vehicles on the surface. See the chart below:

- Add Geotextile Fabric: Once you’ve excavated to the appropriate depth, compact the loose subsoil before adding a layer of geotextile fabric across the entire perimeter. This fabric acts as a barrier to prevent subsoil from migrating into the base and compromising its stability. For added reinforcement, follow this up with a layer of Unilock DriveGrid™ to help stabilize the base and minimize movement over time.
- Layer the base correctly: There are two types of base material you can use at this stage. The first is ¾” minus crusher run gravel (ASTM D 2940), which is a mixture of fines and ¾” stone that can be laid and compacted in 3” layers at a time. The second is ¾” clear angular gravel (ASTM #57), also known as a permeable base. For this type, you may be able to lay 6”-8” of material before compacting. Keep in mind that most plate compactors may only compact up to 4” at a time. If you attempt to compact the full 6”, only the top 4” will compress properly, leaving the bottom 2” at risk of future settling.

- Installing Your Bedding Course: Your bedding course will consist of a 1” layer of either coarse sand or clear ⅛” open-graded stone chip (ASTM #8) on top of your compacted gravel. It’s best to use open-graded stone chip with a base of ¾” clear angular gravel since it is free-draining and contains no fines. If you’re using coarse sand you will need to use ¾” minus crusher run gravel as the combination of stone and sand particles will compact well to form a durable layer. To calculate the appropriate height of your bedding layer, place two rows of 1” outside diameter thick screed pipes directly over your compacted base. Evenly spread your bedding material between the pipes, smoothing it out using a straight board, aluminum bar, or wide-screed rake. Once you’ve reached the appropriate height of your bedding course, carefully remove the pipes and fill in the grooves with coarse sand or chip stone, gently smoothing the surface with a trowel. Avoid stepping on the final screeded layer to maintain a stable, level surface for your pavers.
NOTE: Do not compact the bedding layer before laying your pavers, as this can cause uneven settling and compromise the stability of your installation. Only after all your pavers are in place should you compact the surface. This final step forces the loose sand up between the joints, locking the pavers in place to create a solid foundation.

#3: Not Pulling From Multiple Bundles At a Time
It may seem logical to use all the pavers from one bundle before moving on to the next. However, doing this may lead to a patchy-looking final design, as the natural color variations of the product may not be evenly distributed throughout one bundle.
To achieve a more consistent blend of color and texture, pull pavers from at least three different bundles at a time. Depending on how the product is stacked on the pallet, you can work in either vertical sections or horizontal layers to create a more balanced, visually appealing finish.

#4: Not Installing Edge Restraints
If you’ve ever seen pavers that appear to be shifting apart from each other, chances are that the project lacks proper edge restraints. This can lead to unsightly gaps and create a potential tripping hazard in your space. Edge restraints must be installed around the entire perimeter of a project except in areas where pavers meet a solid foundation, like a planter, step, or retaining wall.
Here are a few tips to consider when installing your edge restraints:
- Extend your base: When excavating, be sure to extend your base at least 6” beyond the edge of your paver installation. This will ensure structural support for your edge restraints and provide long-term stability for your project.
- Choose quality edge restraints: We recommend using either a plastic edge restraint secured with non-galvanized metal spikes or a modified concrete edge that is troweled into a wedge shape. Both options will help maintain the integrity of your pavers during freeze/thaw cycles. Before placing your edging, scrape back the bedding layer so the restraint sits directly on the compacted base for optimal performance.
- Consider your base material: The type of base material you’re using will help determine which edge restraint is best for your project. Plastic edge restraints are only effective when used with ¾” minus crusher run gravel, as the combination of fines and stone helps anchor the spikes. If you’re using ¾” clear angular gravel, a concrete edge restraint is a better option. Always follow the manufacturer’s instructions for proper edge installation.
- Install before final compaction: Edge restraints must be installed before you perform your final compaction to ensure your pavers are properly set into the bedding layer.

#5: Improper Slope for Drainage
Depending on your terrain and local rainfall conditions, planning for proper drainage is essential to prevent future flooding, erosion, and costly repairs down the line.
- Check for proper slope: Use a level attached to an 8-10’ long board or an aluminum straight edge to check your slope. Measure the height from the board to the ground at different points using a tape measure. Generally, all pavement lines and final elevations must slope away from the home by a minimum of 2% (about ¼” per foot). Walkways may have a slope of up to 5%, provided you’re using a non-slip textured paver, such as Beacon Hill™. If the slope is steeper than this, consider adding steps or levels to reduce the incline.
- Create a Drainage Strategy: Work with your Unilock Authorized Contractor at the earliest stages of your project to come up with a drainage strategy for your home. Ideally, you’ll want to avoid flooding by ensuring all rainwater is diverted away from your home, garage, or any low-lying areas around your foundation. Make sure to reroute any downspouts onto nearby grassy spots to ensure that fallen rainwater is directly nourishing plant life. This approach helps reduce runoff that might otherwise carry harmful pollutants into storm drains and local waterways.
- Consider Permeable Pavers: If you’re looking for an eco-friendly solution for your outdoor space, consider choosing permeable pavers for your project. These pavers are manufactured with special spacer bars, creating a wider joint gap that allows excess rainwater to infiltrate between the joints and be absorbed into the subsoil below.

#6: Compacting Pavers Before Joint Sand Installation
As you near the final stages of your project, one important step you’ll need to complete is the final paver compaction. This step should only be done once all your joint sand has been installed. If you accidentally compact any joint sand into the pavers, this can lead to scuffing or trapped particles that will affect the aesthetic appeal of your project.
Here are a few tips to avoid this:
- Sweep and blow away leftover debris: Use a soft-bristle broom or leaf blower to remove loose joint material. Keep the leaf blower at a safe distance to avoid dislodging the joint sand.
- Use a protective pad: Always use a protective pad under your vibratory plate compactor to prevent surface damage to the pavers. Alternatively, you can also use a vibratory roller compactor.
#7: Improper Application of Polymeric Sand
Applying polymeric (or jointing) sand is a crucial step in paver installation, as it helps stabilize the pavers and prevent future weed growth. While Unilock does not manufacture polymeric sand, we recommend using a product that meets ASTM C144 or C33 specifications while carefully following the manufacturer’s installation guidelines. Skipping these steps during application can result in sand sticking to the paver surface, which may affect the final appearance of your pavers.
Here’s how to properly install polymeric sand on your project:
- Sweep in sand: After installing your pavers, evenly spread polymeric sand across the surface. Use a soft-bristle broom to sweep sand into the joints until it sits roughly 1/8” below the beveled or rounded edge of each paver. Use a leaf blower on a low setting to remove any excess fines or dust from the surface.
- Compact the Surface: Use a vibratory plate compactor to compact the paver surface, allowing the sand to settle into the joints. Sweep additional layers of sand across the surface and repeat the process until the joints are filled to the appropriate depth.
- Activate with water: Once the sand is fully settled into the joints and the surface is free of residue, use a hose with an adjustable sprinkler head attachment to lightly wet the pavers. This step activates the sand’s binding agents, locking the pavers in place. Always follow the manufacturer’s instructions for watering the pavers, as they may vary depending on the type of sand you’re using. Avoid over-saturating, as too much water can wash away the binding agents and weaken the joints.
NOTE: For permeable applications, use either ⅛” clear chip stone (ASTM #8) or a permeable resin-based sand instead of traditional jointing sand to enhance water infiltration between joints.

#8: Not Maintaining a Clean Job Site
Keeping the site clean isn’t just about appearances; it’s essential for staying organized and preserving the beauty of your pavers. Job sites can quickly become messy due to dirt, dust, and debris that can accumulate from foot traffic, power tools, and other machinery. To avoid this, make it a habit to regularly sweep the surface, cover any unused materials with tarps to protect them from the elements, and clean up spills immediately to avoid discoloration or staining. Maintaining a clean job site helps make the installation process run smoothly while allowing you a chance to step back and appreciate your progress.
Wrapping Up on Proper Paver Installation
Proper paver installation requires careful planning, quality materials, and attention to detail. By avoiding these common installation mistakes, you’ll ensure your outdoor space remains stable, safe, and beautiful for years to come.
If you’re looking to tackle a DIY project, visit our DIY page to learn how to build a paver patio. Otherwise, consider hiring a Unilock Authorized Contractor by visiting our Find a Contractor page and filling out the form. From there, we can match you with a local contractor who can provide you with a free design consultation.
Related
Articles
We’re Here To Help
We make it easy to get inspired, plan, and start your project.

See our Catalog of Dreams
Explore ideas, spark inspiration, and see our full range of Unilock products.

Get your freeestimate today
Partner with a Unilock Authorized Contractor for best-in-class results.

Plan your dream project beautifully
Excited to start a new project? Get our Project Planning Guide and plan with ease.