

Working with a Unilock Authorized Contractor is working with the best of the best. Our UACs possess the knowledge and expertise to bring your dream project to life, and deliver stunning results that will exceed your expectations.
Share this

Do's and Don'ts of Paver Installation: Step 2 of 3 – Base Preparation
You’ve completed your plan and pre-installation work, now it is time to get your project started.
Preparing a proper base is crucial for any paving stone project; again, we suggest you refer to the Unilock technical guide and take into account the following pieces of advice to ensure the pavers are being placed on a substantial base.
Don’t cut corners.
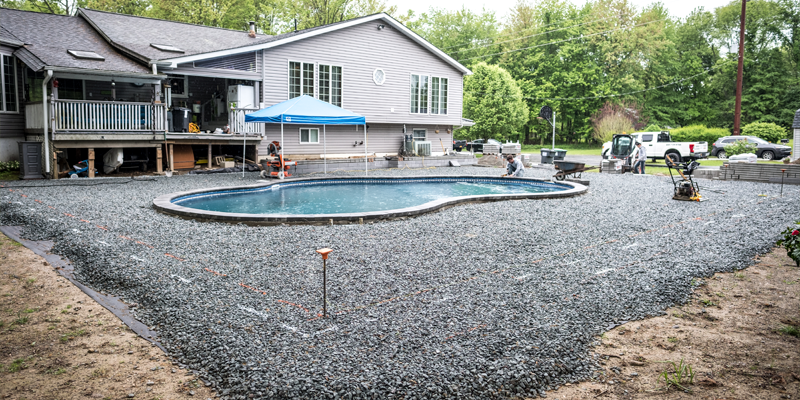
Now that you have decided on the size of the job and its design, you can start the excavation. It is critical to ensure that all phone and gas lines have been marked. You must also over-excavate the perimeter of the area as you need to extend your base preparation past the finished size. The recommendation for over preparation is that the base material should extend past the paved edge an equal distance of the base depth.
For example, if your patio is 20 feet by 10 feet and you are installing 6 inches of granular material as a base, then you must excavate an area 11 feet (10’ + 6” + 6”) by 21 feet (20’ + 6” + 6”).
Accurately Measure Required Base Material
What depth of base materials is necessary? There is no absolute rule to determine how required depth, however recommendations vary by use. The guidelines are 4 to 6 inches for pedestrian walkways and 8 to 12 inches for driveways. Local soil conditions also impact depth needs. Generally, clay bases need to be dug deeper to facilitate drainage.
Consult your local dealer for further guidance.
Do not place plastic under any paving application
Some people place plastic believing this will prevent weed growth. Plastic will entrap water, potentially causing other problems.
In most cases, seeds start from the top of the cracks and work their roots down. The best way to prevent weeds is to use a good polymeric sand and ensure that it has filled joints to within 3 mm (⅛ inch) of the surface.
If you are in an area that is all clay or other poor draining material, it is good practice to place a layer of geo-textile down first, then place your granular base. This will work as a mechanical barrier to stabilize and stop the clay from mixing with your good sub-base materials.
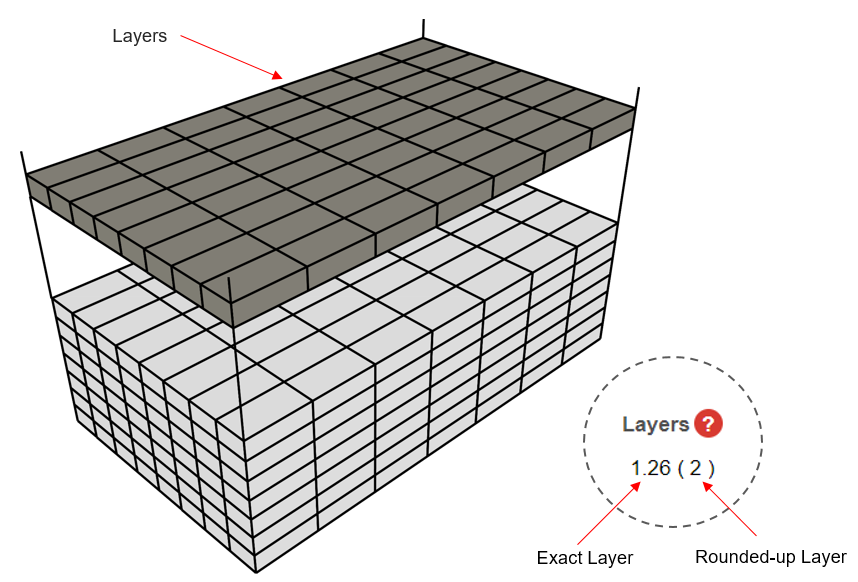
Do not dump in your base materials.
Most traditional plate compactors will not compact any more than 4” of base. If you try to compact 6” of base, you will only compact the top 4” and the bottom 2” will settle in the future. You must compact your base in layers of 3″ – 4″. If you’ve decided on a 6” base, you’ll want to fill and compact your base in multiple phases.
If your base materials are dry, don’t be afraid to add a little water. This will help with the compaction, and cut down on the dust.
Take your time.
You want the base to reflect all of your finished grades so that when you get to the levelling course you will have a nice, thick, consistent layer of bedding material. The more time you spend on the base, the easier the rest of the project will go.
A slope of 1% to 2% is adequate when setting the slope for drainage. It can sometimes be difficult to get an accurate read on slope if you are using a 4’ level. A nice trick to help set slope for drainage when you are using a 4’ level is to tape a spacer under one end of the level and when you read it, level it, this actually means you have your slope.
For an example, to achieve a 1% slope you need a ½” fall in 4 feet. Tape a ½” spacer on one end and when the bubble is centered, you have your slope.
Do not compact the bedding layer.
This is the most common mistake.
There is no such thing as 100% height control in any concrete product. When you do the final compaction, the loose sand will be forced up between the pavers and this will set and secure them. The loose sand will also allow the tamping process to even out the top surface of the pavers.
Use the correct bedding material.
Avoid stone dust or limestone screenings, as these materials usually have too many fines (dust) that trap water that can cause early failure of the pavers.
Sand is often used. Instead of sand, you can also use a small chip stone called “ASTM #9s,” “HPB” or “clear 1/8″ chip.” This material is increasingly popular because it is free-draining and easy to work with in varying types of weather.
Lastly, only prepare as much area with the bedding course as you can lay the pavers on that day, or you may have to re-level the whole area due to unexpected rain or people walking on the area.
By following the above instructions, you will have a proper base to support your pavers and ensure long-lasting quality of your project. These steps will help prepare you for next week’s blog: installing of your paving stones!
Related
Articles

We’re Here
To Help
Browse our Design Idea Catalog
Explore endless design possibilities through our Design Idea Catalog. Browse our extensive portfolio of paver and wall products, and get inspired by our outstanding design projects that will fuel your creative expression.

Visit an Outdoor Idea Center
Experience the beauty and quality of Unilock paver and wall products in a life-sized setting by visiting a local Outdoor Idea Center. Our knowledgeable and friendly staff are on hand to answer any questions and offer free product samples.