

Working with a Unilock Authorized Contractor is working with the best of the best. Our UACs possess the knowledge and expertise to bring your dream project to life, and deliver stunning results that will exceed your expectations.

Share this

Do's and Don'ts of Paver Installation: Step 3 of 3 – Installing the Pavers
As of now, your project area is beginning to take shape with a solid prepared base. The next step is laying the pavers where you can finally begin to see your plan take action! The following guidelines will help ensure your project is exactly what you have imagined:
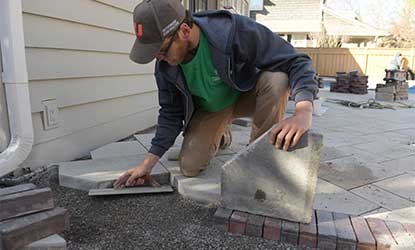
Start by laying the pavers on the longest straight wall
Never assume anything is straight. Foundation walls and poured-in-place curbs are rarely straight. Always use a string line that is spaced approximately ¼” off the wall and follow that. A small gap against a wall will never be seen upon completion of project. If you start your pavers with a crooked line it will get worse as you work away from the starting point.
Do not hammer the pavers together
Laying the pavers too tightly can actually cause some issues in the future. The recommended space between the pavers is 3 mm (⅛”). I don’t expect you to measure the gap but just set them beside one another. You should stop every 4 feet and pull a string line along the laying face, with a screwdriver, adjust that face to the string line. Do not hammer the stones to straighten the face, it is better to space them out.
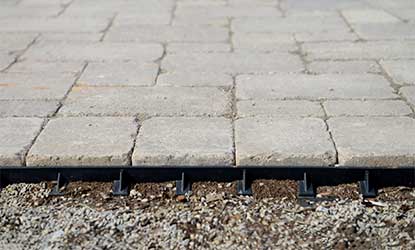
Do use edge restraint – yes you need it!
All projects, regardless of their use, need to be restrained. If pavers are not restrained they will slowly “creep” into the softer surrounding materials and large gaps between the pavers will appear around the perimeter of the area. Most jobs have some edge restraint already there, such as the foundation wall or the sill of the garage, but all other areas need edge restraint. Use an invisible edge system that is spiked into the base materials. These easy to use edge restraints can also help you fine-tune your design because they are flexible. If you are doing a serpentine (curved) area, you can place the edge restraint, put a few spikes in and stand back and look at the curve and make sure that you have a nice consistent pleasing flow to the job, then nail it down.
Do not do your final compaction until you have cleaned the surface
Clean all of all dust and construction debris and inspected the stones for color distribution and quality. If you need to rearrange a few stones, it is a lot easier to do it at this time than after the next stage. Once you have cleaned and inspected, tamp the stones with a compactor in all directions. A protective plate cover for your tamper is a must, as the steel plate can mar or even damage the top surface of some stones. Do one final inspection of the stones and then you are ready to apply the polymeric sand.
Do read the instructions provided on the bag of the polymeric sand.
There are right ways and wrong ways of applying polymeric sands and believe me, the wrong way can ruin a great job.
It is now time to get your project started. Preparing a proper base is crucial for any paving stone project; again, you can refer to the Unilock technical guide as well as take into account the following pieces of advice to ensure the pavers are being placed on a substantial base.
Related
Articles

We’re Here
To Help
Browse our Design Idea Catalog
Explore endless design possibilities through our Design Idea Catalog. Browse our extensive portfolio of paver and wall products, and get inspired by our outstanding design projects that will fuel your creative expression.

Visit an Outdoor Idea Center
Experience the beauty and quality of Unilock paver and wall products in a life-sized setting by visiting a local Outdoor Idea Center. Our knowledgeable and friendly staff are on hand to answer any questions and offer free product samples.